Bananado Hefeweizen
As much as we’ve been diving headfirst into brewing since we started (less than a year ago!), Luke and I have been fairly slow to move outside the styles that we drink the most of. We’ve made a number of pale ales and IPAs, several saisons and abbey-style ales, a sour or two, and a few other, stranger projects, but we’ve been a little cautious about dipping our toes into more specific styles that 1) we drink less often, and 2) come with more prescribed, less forgiving expectations. To some degree, I think it’s reasonable that we would focus on the kinds of beer we most want to drink. We feel like we’re getting a little bit better at the technical side of things though, and a bit more knowledgeable about what goes into a good beer, so we thought a traditional German hefeweizen ought to be within range.
Frankly, I’ve also just been enjoying a good banana-y hefeweizen lately, and we’re both pretty excited to have a bright, crushable beer on tap. Hefeweissens are a pretty by-the-book brew, so most recipes are fairly similar, but we followed the gold-medal winning recipe Jeff the Hefe formulated by Amber and Brian Rower of Pinole, CA, via the American Homebrewer’s Association website.
The most important new skill we were working with here is the step mash. From what I’ve read, step mashes used to be more popular for all kinds of beer, because they are a more efficient way of extracting fermentable sugars from under-modified grain. These days, maltsters use advanced processes that more reliably cause all of their grain to sprout at once, meaning that under-modified grain isn’t really a major consideration anymore. However, step mashes do allegedly create more precursor chemicals to the phenols and esters that give hefeweizens their characteristic clove and banana flavors, respectively. So all in all we thought it would be worth it here.
Another very real consideration for us was that DC was under a tornado watch on brew day, which made us a little nervous to brew outside! We knew the storm would be past by the time we were ready to boil, but the relatively small additions of water at every step of the mash meant that we were able to do the entire thing inside - very convenient. I would actually say that, even though the steps added a fair amount of time to our mash schedule, just being able to do everything inside in regular pots on the stove meant that this was one of our most relaxed mashes yet.
While the storm was rolling in, we ground up our grain and generally did prep work. This time we measured out the water we were going to be using ahead of time and added our water additions to that - I didn’t want to risk the early steps having a seriously out-of-range pH or a high concentration of SO4 by adding them to the mash like we usually do. We also measured our acidulated malt addition to be right at the top of the typical 5.4 - 5.6 pH range so that early additions wouldn’t get too low.The step mash itself was fairly simple. We planned each step using an extremely handy calculator from BrewersFriend, measured out the water from our pre-treated “hot” liquor tank, and only heated up the water we were about to use. Bringing a gallon of water to boil takes less than 10 minutes on the fancy induction cook top we were using, which was lovely compared to our typical brew day.
The first mash in was, admittedly, pretty dry. We added 2 gallons of 125 degree water to 10 pounds of grain, which was enough to get everything wet and up to our target temperature of 114 degrees, but it definitely required a fair amount of vigorous stirring to get everything incorporated and our temperatures close to even throughout the grain bed. For the first several minutes of the first two steps, we had sections of the grain that were way over our target and sections that were way under.
The following steps all used boiling water, but in even smaller, more manageable amounts. The second step was just 0.7 gallons, taking us to 135 degrees, and the third and fourth steps were both 1.2 gallons taking us to a targeted 156 degrees and 168 degrees, respectively. We hit 114 degrees and 135 degrees pretty well for our first two steps, but we were probably closer to 150 degrees and 162 degrees for our next two for whatever reason. Not ideal, but we called it close enough.
Once that was drained off into our boil kettle, we added 3 gallons of 170 degree water for our sparge, took the dog for a quick walk around the block, drained that off the grain and we were ready to boil. I should also note here that this was our first time using rice hulls to improve mash drainage and they worked like a charm. Definitely a worthwhile addition.
By this point the storm was over. We put the kettle on to boil on the front porch where we could keep an eye on it through the door and sat down to eat a bit of pizza and watch an episode of Star Trek: Strange New Worlds (both were excellent). Tettnang hops at the beginning of the boil, which had a lovely aroma that we thought was a bit like hard cheese and a bit floral, yeast nutrient at the end, and we were done.
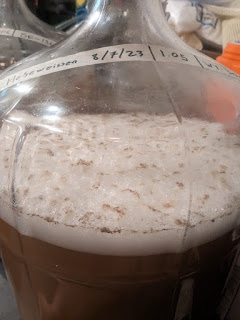
Since this was a bit of an ad hoc brew day, we didn’t have the time to make the 1.5 liter yeast starter that the recipe recommends. We’ve had some dubious experiences with liquid yeasts before, but we tossed this one into the fermentor at around 80 degrees and had a beautiful lightly-toasted-marshmallow krausen by the next morning.
Everything I’ve read about hefeweizens suggests that the key to getting the right balance of banana and clove is controlling fermentation temperature. We don’t have most of our temperature control equipment with us at the moment, but we managed to rig up a cooler full of water in the basement, and with regular checking and a few ice infusions, we’ve been managing to keep it right around 68 degrees for the last few days.
One of the things I really want us to challenge ourselves to do with this one is get a nice crispy bright beer. We usually (well, sometimes) cold crash our beers before we package them, but for this one we’re planning on using gelatin finings as well to really pull most of that yeast out of suspension. Depending on how that looks, we may even try filtering it to get that characteristic pale beer that you can see your fingers through in the glass.
Stats:
Volume in Fermentor: 5.5 Gallons
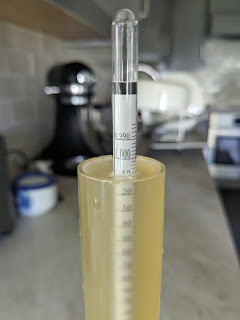
Starting Gravity: 1.05
Water:
- 5 Gallons Step Mash
- 3 Gallons Batch Sparge
Fermentables:
- 4 lbs Pilsen Malt
- 6 lbs White Wheat Malt
- 7 oz Acidulated Malt*
Bittering/Flavoring Additions:
- 1 oz Tettnang hops
Other:
- 1 lb Rice Hulls
- 1.25g Gypsum*
- 0.8g Epsom Salt*
- 1 tsp Yeast Nutrient
- Gelatin Finings
Microbes:
- 1 pkt Wyeast Weihenstephan Wheat Yeast, liquid (WY 3068)
Schedule:
- Mash in with 125F water at 0.2 gallons/pound for a 30 minute rest at 114F
- Add boiling water at 0.07 gallons/pound for a 30 minute rest at 135F
- Add boiling water at 0.12 gallons/pound for a 30 minute rest at 156F
- Add boiling water at 0.12 gallons/pound for a 10 minute rest at 168F
- Drain and batch sparge for 20 minutes at 170F
- Boil for 60 minutes, adding hops at the beginning of the boil
- Cool, transfer to fermenter, oxidate and add liquid yeast
- Ferment for 14 days as close as possible to 68F until primary fermentation finishes
- Cold crash for 3-7 days and add gelatin finings until bright
- Package and force carbonate
Notes:
* These additions are specific to Maryland-area water chemistry, calculated using EZ Water Calculator


Comments
Post a Comment